Table of Contents
ZoomTimeline For Cornerstone - Timeline Pack
Created: 27/02/2011
By: Digital Zoom Studio
Twitter: http://twitter.com/
Facebook: http://facebook.com/dzs
Support - via item comments
Thank you for purchasing my component. If you have any questions that are beyond the scope of this help file - support, via item comments.
Intro - top
Ultimate Timeline Intro - top
Looking for a company timeline ? A shipping log ? Shipping history ? Personal History ? A cool timeline slider ? This plugin has it all. No matter the needs for a timeline, the six modes included cover all the timeline needs.
Awesome for - company timeline, time line, history, company history, shipping history, parcel track display, timeline slider.
ZoomTimeline Features
- HTML5 technology - zoomtimeline uses the latest html5 tehniques ( like Histroy API ) to deliver a never seen before experience to your clients
- fully responsive - looks great from mobile to HD
- six modes - full skins to fit every brand
- CSS3 technology - this player uses cutting-edge css3
- SCSS Powered - easy for developers to modify
- Retina-ready - graphics have double resolution for smooth retina viewing
- easy install - purchase, download the zip, read the docs
- iPhone / iPad optimized - this gallery has been optimized for Apple touch devices
- Android optimized - this component has been tested on Android 4.0 and works awesome
- developer / SASS powered - this component's CSS has been built on top of SASS which means SASS users will have an easy time modifying the skins. For non-SASS users it's no problem either because CSS files ( generated by SASS ) are provided
- 100% css skinable - want to make slight modifications to the skins ? The skins are 100% built from the css and it is very easy to edit with css knowledge
- SEO friendly - built with search engine optimization on mind from the ground up, the Testimonial Rotator uses non hidden valid html markup to build the widget
- compatible with all major browsers, including IE - compatible from IE9 to IE11, Edge, Chrome, Safari and Firefox
Installation - top
First make sure the Cornerstone plugin is installed.
There are two ways to install the plugin:
Method 1 - Direct WordPress Install
- Just download the zip from your http://activeden.net/user/yourusername/downloads directory in a folder of your choosing.
- Unzip it with your preffered unziping utility. On Windows, there can be some warnings while unziping. Those are nothing to worry about if they appear, they are just Mac OS X files that cannot be read by Windows.
- Then in your wordpress installation, in the Plugins panel, click Add New like in this picture:
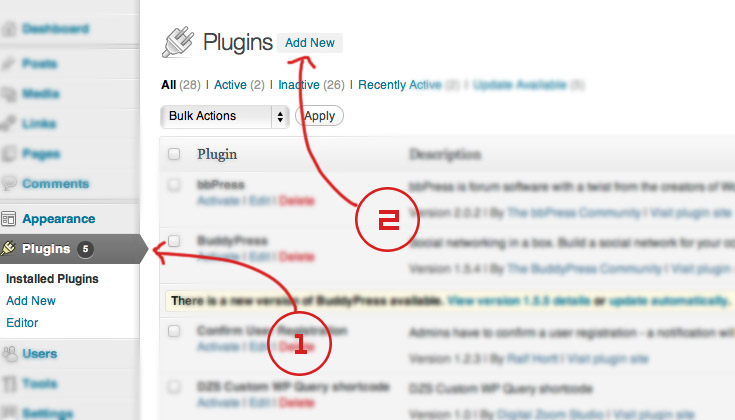
- Then click Upload, and select the zip you have downloaded from CC. Then click Activate.
Method 2 - FTP Install
- Just download the zip from your http://activeden.net/user/yourusername/downloads directory in a folder of your choosing.
- Unzip it with your preffered unziping utility. On Windows, there can be some warnings while unziping. Those are nothing to worry about if they appear, they are just Mac OS X files that cannot be read by Windows.
- Then, if the folder cs_zoomtimeline is zipped, unzip that too. Then copy the folder in the wp-content/plugins folder
_______________
Now you will find the ZoomTimeline in the CornerStone builder

This is a demo install and adding some sample data:
Adding to the Post / Page - top
- access / create your post / page
- use the shortcode generator to create the shortcode. just inputing this is enougth for a basic timeline with posts feed
[zoomtimeline]
- All done!
Special Features- top
Gallery for Items
Use this for appending a lightbox gallery to any item. This menu is available in any timeline item or post.

Where to find category ID
Find out the category ID you want to show by going to the Categories of the post type and clicking on the desired category. The category ID will appear in the link

Localization
From update 4.1 the plugin supports localization. You can read more about it here
The process to translate the plugin is fairly easy:
- download poedit
- go to the plugin folder ( wp-content/plugins/dzs-zoomtimeline or in the package you receive from CC ) to the languages folder
- duplicate default.po and rename the dupe to dzsvg-{region}_{language}.po -> for example for Spain / Spanish it's dzsvg-es_ES.po you can find the format for each language in the link above
- open the newly renamed file in poedit - do the changes and save - a .mo file with the same name will be created - that will be the translation file
Developer Tips / advanced usage - top
This gallery provides source files ( in the source folder ) so if you are developer you can start customizing it.
Recommended Programs
You can generally use any text editing software to edit most content/code, but this is what I recommend:
- .zip – Normally you could just right click and extract to a folder of choice [ on both Mac and Windows ]
- .html - Notepad++
- .js - Notepad++
- .as - Notepad++
- .fla - Flash CS5
design_background_offsetw- only for skin customization purposes - background width offset
How to include in your template file
Just use this snipped of code
<?php echo do_shortcode('[timeline ]'); ?>
Make your own skin
- duplicate skin_white.css to skin-custom.css for example
- import the skin_custom.css stylesheet in your html
- access skin_custom.css and replace all skin_white to skin_custom
- with a little css knowladge ,the possibilities are endless
Digital Zoom Studio